Originally I planned to write about WASI (that's why LLVM logo is in background). It is system interface for WebAssembly. Basically a means to run wasm files without browser and give them access to system stuff. But it turned out that it was kind of boring topic to write about. Just use wasmtime (which I could not compile) or wasmer (which I ran successfully with two commands) and execute wasm files if you desire so.
But today we are going to explore the paths of AssemblyScript and WebAssembly. We are going to learn how to compile TypeScript into WebAssembly and also compare performance of compiled JavaScript and WebAssembly by implementing Game of Life. We will use Ubuntu 18.04 as our OS and webpack as our module bundler.
tl;dr here is codepen with examples:
Run the pen and you will see that WebAssembly gives around 60 FPS, whereas JS gives only 32 FPS. You can also click and drag to add extra chaos to the field.
Alright, back to the tutorial. Let's start with dependencies. You can install latest node using nvm. Then initialize new repo by adding package.json:
{
  "name": "assemblyscript-game-of-life",
  "version": "1.0.0",
  "description": "",
  "main": "src/index.js",
  "scripts": {
    "start": "webpack-dev-server",
    "build": "npm run asbuild && webpack-cli",
    "asbuild": "asc assembly/index.ts -b compiled/gameoflife.wasm --validate --optimize --importMemory --use Math=JSMath"
  },
  "license": "ISC",
  "devDependencies": {
    "assemblyscript": "github:AssemblyScript/assemblyscript",
    "copy-webpack-plugin": "^5.0.4",
    "wasm-loader": "^1.3.0",
    "webpack": "^4.38.0",
    "webpack-cli": "^3.3.6",
    "webpack-dev-server": "^3.7.2"
  },
  "dependencies": {}
}
Here we see start script which is used for developing the application, it opens webpack-dev-server on port 9000. Also we see two build scripts, first is build and it tells webpack to compile it's bundle.js, second is asbuild which tells AssemblyScript to compile ts file into wasm file. Let's stop for a minute on the second script. It has couple of arguments. Interesting ones are importMemory and use Math. Former will allow us to import memory object and use it inside and outside wasm file, latter is needed to import Math object.
Now you can run npm install to install dependencies. Create files assembly/index.ts and src/index.ts. Also create following webpack.config.js:
const path = require('path');
const CopyWebpackPlugin = require('copy-webpack-plugin');

module.exports = {
  entry: './src/index.js',
  devtool: 'source-map',
  resolve: {
    extensions: [ '.js' ]
  },
  module: {
    defaultRules: [
      {
        type: "javascript/auto",
        resolve: {}
      },
      {
        test: /\.json$/i,
        type: "json"
      }
    ],
    rules: [
      {
        test: /\.wasm$/,
        use: 'wasm-loader'
      }
    ],
  },
  output: {
    filename: 'bundle.js',
    path: path.resolve(__dirname, 'dist')
  },
  plugins: [
    new CopyWebpackPlugin([{ from: path.resolve(__dirname, 'index.html'), to: path.resolve(__dirname, 'dist') }])
  ],
  devServer: {
    contentBase: path.join(__dirname, 'dist'),
    compress: true,
    port: 9000
  }
};
defaultRules is shamelessly copy-pasted from this github issue. I have no idea how that works but that's not the point. The point is: we can now import wasm files!
But let's start simple. Create index.html:
<!DOCTYPE html>
<html>
  <head>
    <meta charset="UTF-8">
    <title>Game of Life</title>
  </head>
  <body>
  <script type="text/javascript" src="bundle.js"></script>
  </body>
</html>
In src/index.js write:
import GameOfLife from '../compiled/gameoflife.wasm'

async function start() {
  const memory = new WebAssembly.Memory({ initial: 256 })
  const importObject = {
    env: {
      abort: () => {},
      memory
    },
    imports: { f }
  }

  const game = await GameOfLife(importObject)
  const { add } = game.instance.exports

  function f(x) {
    console.log('f', x)
  }

  console.log(add(12, 30))
}

start()
To be sure, f is a bad name for a function. But on each step of building this project it helped me so much that it grew on me and I don't want to change it now. Now for assembly/index.ts:
@external('imports', 'f')
declare function f(x: i32): void

f(1)

export function add(x: i32, y: i32): i32 {
  return x + y
}
The moment of truth: run npm run asbuild, then npm start and open localhost:9000 in your favorite (not IE) browser. Open developers tools (F12 in chrome) and look at the result.
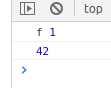
The reason this result is important is that we were able to use core mechanics like import function f from js to wasm and run that function, export and run function add from wasm and also load wasm file using wasm-loader.
Do you like modules? I do! Let's extract index.js as a separate GameOfLifeWebAssembly.js module. Create a new file with:
import GameOfLife from '../compiled/gameoflife.wasm'

export default async () => {
  const memory = new WebAssembly.Memory({ initial: 256 })
  const importObject = {
    env: {
      abort: () => {},
      memory
    },
    imports: { f }
  }

  const game = await GameOfLife(importObject)
  const { add } = game.instance.exports

  function f(x) {
    console.log('f', x)
  }

  return { add }
}
And also introduce Main module in index.js:
import GameOfLifeWebAssembly from './GameOfLifeWebAssembly'

async function Main() {
  const game = await GameOfLifeWebAssembly()
  console.log(game.add(12, 30))
}

window.addEventListener('load', Main)
You can run the application again to make sure it produces the same output as before the refactoring. Now add a canvas to your index.html <body>:
<canvas id="canvas"></canvas>We will need this canvas to display alive and dead cells. 1 cell = 1 pixel on the canvas. Some js code will be needed to display Uint32Array on the canvas. In your index.js:
  const width = 100
  const height = 100

  const canvas = document.getElementById('canvas')
  canvas.width  = width
  canvas.height = height

  const context = canvas.getContext('2d')
  const imageData = context.createImageData(width, height)
  const imageDataView = new Uint32Array(imageData.data.buffer)

  imageDataView[0] = 0xFF000000

  context.putImageData(imageData, 0, 0)
We create new ImageData and set first value to 0xFF000000. uint32 stands for 32 bit unsigned integer. Unsigned means that first bit does not indicate its sign, so every uint32 ranges from 0 to 2^32 - 1 = 4294967295. Each uint32 in array represents a pixel on the canvas and is in format ABGR which stands for Alpha, Blue, Green, Red. Alpha channel is the transparency of the color, where 0xFF means opaque. To sum it up we get an opaque black pixel. Open localhost:9000 and look at the black pixel in the top left of your screen.
Calling external js functions from wasm is slower than writing and reading shared memory. From js side we will need a memory view in GameOfLifeWebAssembly.js:
const memory = new WebAssembly.Memory({ initial: 256 })
const memoryView = new Uint32Array(memory.buffer)
...
return { memoryView }
From wasm side we will need functions store<u32> and load<u32> in index.ts:
@external('imports', 'width')
declare const WIDTH: i32

@external('imports', 'height')
declare const HEIGHT: i32

@external('imports', 'f')
declare function f(x: i32): void

const BLACK = 0xFF000000
const WHITE = 0

function set(x: i32, y: i32): void {
  store<u32>(toPointer(x, y), BLACK)
}

function toPointer(x: i32, y: i32): i32 {
  return (y * WIDTH + x) * 4
}

set(0, 0)
set(0, 1)
Don't forget to import width and height. Also in index.js we will need to copy data from shared memory to canvas. To do this try:
  const imageDataView = new Uint32Array(imageData.data.buffer)

  imageDataView.set(game.memoryView.slice(0, width * height))

  context.putImageData(imageData, 0, 0)
Now open localhost:9000 and look carefully. You should be able to spot 2 black pixels in the top left corner.
Now grab index.ts from my github repo, modify GameOfLifeWebAssembly.js like that:
import GameOfLife from '../compiled/gameoflife.wasm'

export default async (width, height) => {
  const memory = new WebAssembly.Memory({ initial: 256 })
  const memoryView = new Uint32Array(memory.buffer)
  const importObject = {
    env: {
      abort: () => {},
      memory
    },
    imports: { f, width, height },
    Math
  }

  const game = await GameOfLife(importObject)

  console.log(game)
  const { randomize, step } = game.instance.exports

  function f(x) {
    console.log('f', x)
  }

  return { randomize, step, memoryView }
}
To add game loop we will need requestAnimationFrame function. In index.js:
  game.randomize()

  function cycle() {
    game.step()
    imageDataView.set(game.memoryView.slice(0, width * height))
    context.putImageData(imageData, 0, 0)
    requestAnimationFrame(cycle)
  }

  cycle()
Run npm run build. Voila! You have 100x100 working Game of Life on localhost:9000.
Also to further address performance questions, I added a simple benchmark in my repo. I make game's step couple of times on randomized board and measure milliseconds it takes to complete. Results are:
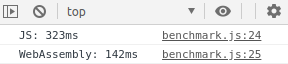
JS takes twice as much time as WebAssembly to calculate. This benchmark is representative because rendering on canvas is identical for JS and WebAssembly code.
Final version with JS/WebAssembly comparison and also painting feature is available on my github.
Fun fact: before @inline-ing some functions in wasm its FPS was comparatively lower than FPS of JS code.
Important note: official AssemblyScript repository has Game of Life already implemented. Here is their source code. I learned some mechanics by reading this code. There are other tutorials that helped.
P.S. Look at this cool demo with simulation of the wave equation.